
GUI (Graphical User Interface) plays a very integral role in daily interactions, may it be a website, an application or anything on the net.
To make things easier, We have the Tkinter library which provides tools for writing programs that use GUI (Graphical User Interface).
You can make widgets like Buttons, scale, menu, scrollbars, labels, drawing screens, and many more with a few lines of code.
To specifically draw pictures, you can use the canvas widget on which various drawings can be made which includes basic shapes like circle, square, rectangle, lines, images, adding texts
Now, to use the Tkinter Library, we will be using the Python programming language.
So, what is Python?
According to python.org, Python is an interpreted, object-oriented, high-level programming language with dynamic semantics. It’s high-level built-in data structures, combined with dynamic typing and dynamic binding, make it very attractive for Rapid Application Development, as well as for use as a scripting or glue language to connect existing components together. Python’s simple, easy-to-learn syntax emphasizes readability and therefore reduces the cost of program maintenance. Python supports modules and packages, which encourages program modularity and code reuse. The Python interpreter and the extensive standard library are available in source or binary form without charge for all major platforms and can be freely distributed.
It is thus an easy to use and efficient programming language.
Now that we understand the basic blocks,
Lets get started!
Also read How to convert a list to a string in Python?
Before writing the main code, lets understand a few basic concepts–
tk() is a function for the main class. This will help us to import all the classes from the tkinter library
Tkinter library provides a variety of widgets like button, frame, canvas, check-button, menu, list-box, combo-box, level, level-frame, menu button, message, progress bar, radio button, scroll bar, separator, and many more. We will go through a few of them in this article.
Now, once we decide on designing a widget, there are a few attributes we can manipulate like the dimensions, the fonts, the colors of the widgets, bitmaps, anchors and cursors.
These are necessary when we need to customize according to our requirements.
Not only this, there are a few methods to manage the geometry of the widgets.
For example, the pack() method which is used to manage the geometry of the widgets in blocks.
To organize the widgets in tabular form, we can use the grid() method and if we need to place a widget at a specific position, we can use the place() method and so on.
Now, there are a few steps we need to follow every time to build these widgets as listed below-
STEPS
The first step is to Import the Tkinter module.
Next, we create the GUI application main window.
Once this window is created, we start building our widgets.
In the final step, we enter the main loop to perform some action related to each widget triggered by the user.
So, let’s write the code for our first widget,
Getting the main screen where all the further widgets we make will be displayed
 from tkinter import *

 root = Tk()

root.mainloop() 
Now to make a rectangle and display it on the screen we write the following code (explained below)-
 from tkinter import *

 root = Tk()

 root.geometry('800x600')

 c  = Canvas(root, width=800, height = 600)

 c.pack()

r = c.create_rectangle(0, 0, 50, 50, fill='red', outline='black') 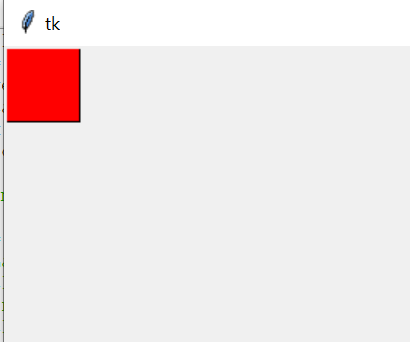
The above lines display the code to make a red colored rectangle, with black outline, having width and height of 50 and starting from the 0, 0 position of the canvas i.e. the extreme top left. The canvas has a size of 800 by 600, width and height respectively. These dimensions can be altered according to the requirements.
In similar ways you can build other shapes with different attributes.
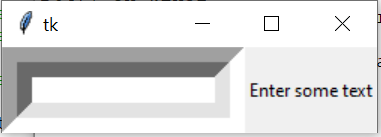
Next, we make a text box to allow users to enter text.
 from tkinter import *

 root = Tk()

 L1 = Label(root, text="Enter some text")

 L1.pack( side = LEFT)

 E1 = Entry(root, bd =5)

 E1.pack(side = RIGHT)

 root.mainloop()
The above code when executed will display a text area with the label ‘Enter some text’. If you want to place this label on the Right of the text box, mention RIGHT in the side variable or LEFT to place it on the left of the text box.
Next, we used a function Entry() where bd is used to give the border to the textbox. The default size of the border is 2 pixels, which can be set to any other desired value.
You also have various other commands like bg which is used
If you wish to alter the background color, the bg command can be used and along with it you can specify the color of your choice.
You can also change the cursor type from arrow to dot or any other type using the cursor option.
Similarly, to change the color of the text you type, fg command can be used.
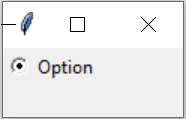
Now, giving the users to select from multiple options is also a basic requirement. So designing radio buttons is not a bad option.
 from tkinter import *

 root = Tk()

 R1 = Radiobutton(root, text="Option ",  value=1)

 R1.pack( anchor = W )

 label = Label(root)

 label.pack()

 root.mainloop()
The code is pretty simple, we just need to add a few lines of code to display the radio button and the Radiobutton function makes it super easy. You can specify the parameters like the text to be displayed along with the button, its value just like the one in a basic HTML form.
Next, we see how to make a scale widget with a movable slider
Again you just need to use a different function called Scale along with a few parameters according to your requirement.
 from tkinter import *

 root = Tk()

 R1 = Scale(root)

 R1.pack( anchor = CENTER )

 label = Label(root)

 label.pack()

root.mainloop() 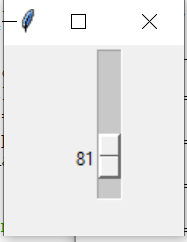
The scale in the above image is movable and can go from 0 to 100.
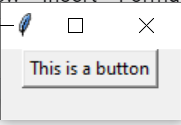
Next,we will make a normal press button
The code for this is given below. The main part of the code is the Button function which displays the button on the screen
 from tkinter import *

 root = Tk()

 R1 = Button(root, text="This is a button")

 R1.pack( anchor = CENTER )

 label = Label(root)

 label.pack()

 root.mainloop()
Additionally, you can give text to the button like “submit” or “share” or anything. You can add various other attributes like color of the button, color of the text, change its size and style and do various other cool stuff.
Now if you want to give your users a list to select from, we also have a Listbox() function for this which will display a number of items in list form from which users can select the items.
Here is the code for getting a List of items on your screen
 from tkinter import *

 root = Tk()

 L1 = Listbox(root)

 L1.insert(1, "Item 1")

 L1.insert(2, "Item 2")

 L1.insert(3, "Item 3")

 L1.insert(4, "Item 4")

 L1.insert(5, "Item 5")

 L1.pack()

root.mainloop() 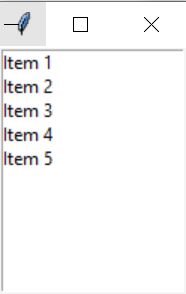
Like we did for previous widgets, similarly, we can add attributes to this listbox as well. Some common attributes include text colour, background color, size, style, etc.
So, these are a few common widgets using the Tkinter library in Python. You can explore various other widgets and their features.