")
Nowadays, everyone on earth has a list of things to be completed and we look for ways to organize it. So, we either build this imaginary list in our mind and keep scrolling in our mind throughout the days or write it down on a piece of paper. And when the time comes, we are rather searching the paper than doing our task. Or the next way we find to deal with such things is using various Apps. Why do so much hustle when you can build one for yourself and personalize it according to your needs?
So, Let’s get started!
You will only need a text editor for this. I will use Visual Studio Code
We will be using Javascript for this and with just a few lines of our code we will successfully make a to-do list for ourselves
INITIAL STEPS
Create a new folder. I named it as MyToDoList
Now, create three files namely index.js, index.html, and styles.css
You can keep any name you like
Start with the index.html file and write down the basic HTML format.
We will be using a little of Bootstrap for the front end, so add the stylesheet and script to add Bootstrap to your project.
Also read How to Design a Form using HTML
Understanding the HTML Code
Now, give your page a heading using the h1 tag
I gave the heading as My To-Do List
You can add some additional information like enter your tasks or I added – Make Life Simpler, List your tasks for today!
Next, Make a form where you will take the input from the user and add a button to its side.
After writing the task when they click the button, the task will be displayed on the screen
Now we will be considering a few important points here
First, add an id to the input box so that the text value can be retrieved later on.
Next, To the button add a function that will execute when the button is clicked.
We will talk about the function in detail a little later!
Next to display the tasks display in order, make an empty ordered list where we will append all the tasks with the option to delete them once they are done.
Give this unordered empty list a unique id.
Also, remember to add the styles.css in the head and the index.js file at the bottom of the body of the HTML file.
That’s it for the HTML code.
The complete code is shown below
Also Read 5 Beginners Projects to get started with Raspberry pi
Index.html
 <!DOCTYPE html>

<html lang="en">

 <head>

     <meta charset="UTF-8">

     <meta http-equiv="X-UA-Compatible" content="IE=edge">

     <meta name="viewport" content="width=device-width, initial-scale=1.0">

     <title>My To-Do List</title>

     <link href="https://cdn.jsdelivr.net/npm/bootstrap@5.0.0-beta2/dist/css/bootstrap.min.css" rel="stylesheet" integrity="sha384-BmbxuPwQa2lc/FVzBcNJ7UAyJxM6wuqIj61tLrc4wSX0szH/Ev+nYRRuWlolflfl" crossorigin="anonymous">

     <link href="./styles.css" rel="stylesheet">

 </head>

 <body class="bg-dark text-white mx-5 my-5">

     <h1>My To Do List</h1>

     <h5>Make Life Simpler, List you tasks for today!</h5>

     <form class="row my-5" onsubmit="return false;">

         <div class="col-auto">

             <input type="text" class="form-control" id="inputVal" placeholder="Add
your task here..">

         </div>

         <div class="col-auto">

             <button type="button" class="btn btn-outline-light"
onclick="AddItem()">Add Task</button>

         </div>

     </form>

     <form class="row my-3" onsubmit="return false;">

         <div class="col-12">

             <ol id="mylist"></ol>

         </div>

     </form>

     <script src="./index.js"></script>

     <script src="https://cdn.jsdelivr.net/npm/bootstrap@5.0.0-
beta2/dist/js/bootstrap.bundle.min.js" integrity="sha384-b5kHyXgcpbZJO/tY9Ul7kGkf1S0CWuKcCD38l8YkeH8z8QjE0GmW1gYU5S9FOnJ0" crossorigin="anonymous"></script>

 </body>

 </html>
Understanding the JavaScript code
The getElementById() method returns the element that has the ID attribute with the specified value to the variable ‘textinp’.
Then we add an event listener keypress. So while entering the text each time the key is pressed the function EnterPressed will be called.
This is added so that we can use the enter button on the keyboard to add a task to the list.
Now, in the EnterPressed() function, we check if the value entered by the user is not empty and if the enter key is pressed then the function AddNow will be called.
To check if the enter key is pressed val.keycode === 13 is used.
Another function, AddItem() is called when the button we created earlier is clicked. This function also behaves in a similar way. It checks the entered value. If empty, it shows an alert to the user indicating that nothing is added, and if not then it also calls the function AddNow() with the text as a parameter.
Now let’s have a look at how the AddNow() function works.
The variable itemVal stores the text input from the user
Then we create a list element which is done using document.createElement(“li”).
Then a text node is created which will contain the input text.
Next, using the appendChild() method, we append a node as the last child of the node.
Lastly, we append this complete list element to the unordered list we created earlier in our HTML code.
Along with each task, we add the functionality of deleting it once it’s completed.
For this, we create a button element with the text DELETE and then append this button to the list element we created earlier.
Further, we add classes btn and btn-outline-danger which are bootstrap classes for styling the delete button
We also add a class named delBut which will be used for styling.
Then to see when the delete button is clicked by a user we add an event listener to it. This will call the function deleteItem when the button gets clicked.
The function deleteItem() when called will add the class named del to the specific list item. The class del is a user-defined class
At the end of this function, we substitute the text written in the text box by the user with an empty string so that a new value can be added next time. This is done after the text is added to the list and displayed on the screen.
The complete code for index.js file is shown below-
Index.js
 var textinp = document.getElementById("inputVal");

 textinp.addEventListener("keypress", EnterPressed);

 function AddItem() {

     var itemVal = textinp.value;

     console.log(itemVal);

     if(itemVal != ""){

     AddNow(itemVal);

     }

     else {

         window.alert("Empty")

     }

 }

 function AddNow(itemVal) {

     var listItem = document.getElementById("mylist");

     var node = document.createElement("li");

     var textval = document.createTextNode(itemVal);

     node.appendChild(textval);

     // delete button

     var btn = document.createElement("button");

     var delBut = document.createTextNode("DELETE");

     btn.appendChild(delBut);

     node.appendChild(btn);

     btn.addEventListener("click",deleteItem);

     btn.classList.add("delBut","btn","btn-outline-danger");

     listItem.appendChild(node);

     textinp.value = "";

     function deleteItem() {

         node.classList.add("del");

     }

 }

 function EnterPressed(val) {

     var checkVal = textinp.value;

     if (checkVal != "" && val.keyCode === 13) {

         AddNow(checkVal);

     }

 }
Understanding how Styles.css works
Next, in the styles.css file, we have written two user-defined classes.
First is the del class which makes the display as none. Thus, the task deleted will just hide from the screen and not actually get deleted from the code.
Then we have the class named delBut which is used to add a significant amount of margin to the left and bottom of the delete button.
The code for styles.css file is shown below-
Styles.css
 .del {

   display: none;

 }

 .delBut {

   margin-left: 5cm;

   margin-bottom: 0.5rem;

 }
I have kept the styling of the complete list very basic, you can add more if you want.
Below is the screenshot of the To-Do List Webpage
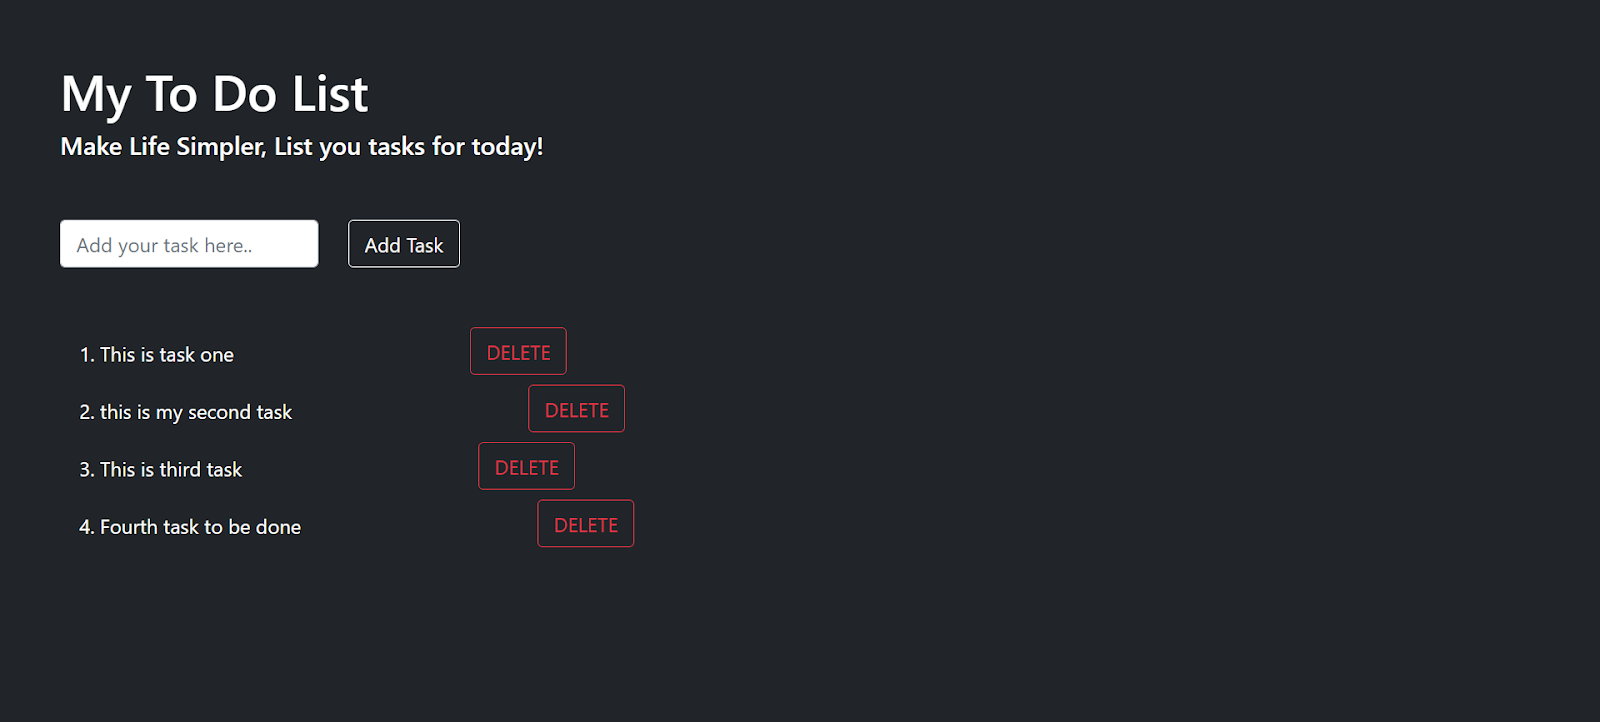
Now, if I delete my third task, it will update the fourth one as the third as shown below.

That’s it!
You have successfully created your To-Do List!