
Like every one of us, you must also get several emails from various websites and businesses daily. The number does not matter, but our inboxes get clogged with such emails. We don’t open every email we receive, but we still appreciate it if we get value in these emails.
As we have experienced, most of the time, we find relevant content in the emails that have beautiful visual presentations.
This is the thing with emails from any brand, service, or e-commerce store. WordPress is not an exception. It also sends emails to your website’s visitors.
If we talk about the default email settings of WordPress, then we can say that the emails sent by WordPress by default are pretty minimalist. These emails are not even optimized and contain just text. Thus, we can say that these don’t highlight your website as they should.
Such notification emails represent your website and make the website’s visitors remember you, and If these emails are not good enough to grab your attention, it would be a shame for your brand.
For your readers to get beautiful emails, WordPress provides plugins that will help you in customizing the emails from your WordPress website, that too, without any coding.
What are Default Emails on WordPress?
WordPress is a tool that helps us in creating websites of every type, such as e-commerce, blogs, etc. Along with it, this powerful CMS can also send emails automatically. WordPress websites cover about 40% of the total world web and can do the same email thing for every website.
These emails are generally to confirm actions got performed on your WordPress website. And such emails are called transactional emails.
Such emails, for instance, provide the following kind of notifications:
- Notification of any new comment on any of your website pages.
- Resetting user’s password.
- Notification regarding the registration of new participants on your website.
- Notification of comment replies and so on.
However, such emails are practical and valuable too. Imagine if you lost your password, then you must be looking for an email in your inbox, Right? This is indeed a critical flex, but still, there is a huge flaw in this system.
To know more, you will have to give a read to this article till the end.
Why should you Customize the Default WordPress Emails?
These are just ugly emails that don’t let you be polite or respectful to the readers. So, if you are getting these emails, then it might be okay. But when your users get such ugly-looking emails, they will certainly lose interest in your website.
The reason for these emails not being appropriate for your users is their zero customization. You can know of it from the following facts:
- The sender’s name is shown as WordPress in these emails. So, after a bit of snooping, the users can find which website has sent this email.
- It does not contain any image or logo, making it obvious for users to know the website at first glance.
- The emails are just ugly. They don’t even have any text formatting which makes it boring to read these emails.
To strengthen the identity of your brand, this is not an excellent way to communicate with users. There should be something better to offer to them. If they get personal and customized emails, it will definitely attract your readers to your website or brand. It will enhance their user experience.
Incorporating an image and personalized text will help in doing all that we discussed. You can customize your WordPress emails with the right tools and plugins.
This article will understand these plugins, which will help you enhance your brand’s reputation easily.
Top Plugins for customizing WordPress Emails
WP Better Emails:
This plugin for email customization is a very efficient, simple, and efficient one. If you want to get started with email customization, then this plugin will be suitable for you. It has minimum setting options which makes it an appropriate choice for beginners.
With this plugin, you can do the following customizations:
- Defining the name of Sender as well as the email address. It will modify the wordpress@yoursite.com sent by WordPress by default.
- Customizing the email template by using a text editor. It will let you modify just 2 of the small texts at the bottom, including “For any queries, contact…” and “email sent on..”.
For further customizations, you will need to go with HTML or CSS coding. It makes it difficult to be used by beginners. But, if you are comfortable with these coding lines, then why not?
Also Read
- How to fix an “Error establishing a database connection” in WordPress?
- Best Rating Plugins for WordPress
- How to Add Google Translate in WordPress?
- 5 Best WordPress Themes For 2021
WordPress Email Template Designer:
This plugin is rated the highest across all email plugins. The rating is 4.9 out of 5.
Some attractive assets of this plugin include:
- It has a library of about 26 templates which can be used even by the beginners while designing an email.
- It lets you change the email address and also the name of the sender.
- It allows us to add any logo or image at your email’s header.
- It comes with icons which may help you in checking your email’s responsive display on any smartphone.
This plugin has some interesting features which may prove to be right for you.
Since you have one more choice, too, so keep reading for an even better plugin.
Email Templates:
However, the reviews of this plugin are not as good as it looks to us. But we will recommend this email plugin for every WordPress user who is a beginner.
Once you have installed the plugin, you can create your own email template in just 5 minutes, along with the color of your website. Sounds cool, right?
Just like a cherry on the cake, it comes with Customizer which is a customization tool. When you will go to Appearance and then Email Template, it will give you options to manage the email appearance, both in real-time and visually.
Customizing WordPress Emails by using “Email Templates”
We will now be talking about the setting up of the Email Template and how to do a guide for customized emails.
First of all, you have to install the above-mentioned “Email Templates.”
After installing it, select ‘Appearance’ and then go to ‘Email Templates’. The page that will open after this will look something like this:
- On the left side of this page, you will find a menu of settings divided into six parts.
- On the right side of this page, you will see the WordPress default email template. When any changes will be made, these will appear here directly.
The various options you get with this plugin include the following:
- Settings: Along with the customization options, you can also change the email and name of the sender.
- Template: Within this set of setting options, you can perform the following customizations in your emails:
- Format: It gives options of boxed email or full width. Also, you can select the width.
- Background color
- Custom CSS Code
- Email Header: Header customization allows you to do the following things:
- Adding text to the email header.
- Including a Logo.
- Changing background color
- Aligning (left, center or right)
- Text size and color (if you are not using a Logo)
- Email Body: This is the place where the principal content of email will be placed. For the email body, you can customize the following:
- The size of text
- The color of background
- The color of text
- The color of links
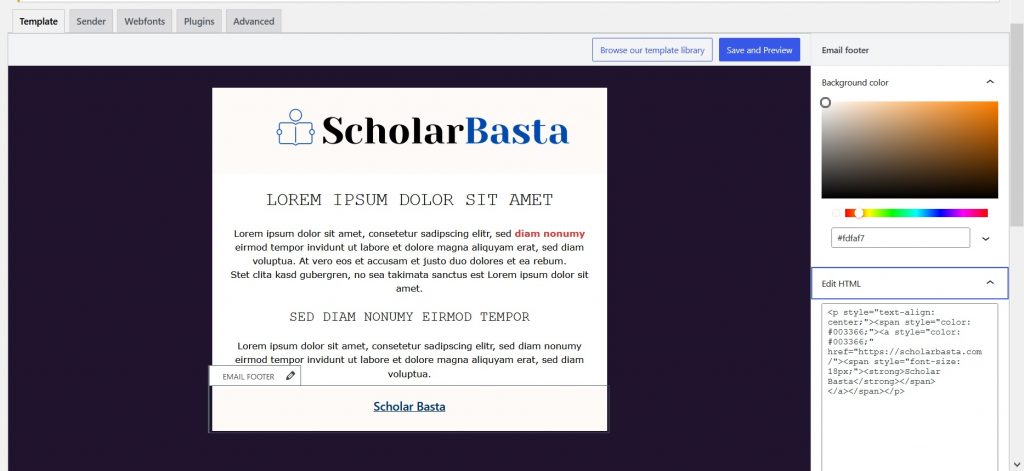
- Footer: This is the last area which you can modify with this plugin. In the footer, you can edit the following:
- Alignment (left, right or center)
- Content of email footer
- Color of the text
- Text size
- Sending Test Emails: At last, you can test your created emails too. For this, what you need to do is click on the “Publish” button, present on the top right side of this window. It will save the email template. And then, click on the “Send” button.
This test email will just be sent to you, i.e. the administrator. From this email sent to you, you can now check for any flaws in your email and see how it will look to your readers.
How to create custom email template in WordPress?
The plugin “Email Templates” uses WordPress Customizer with which you can create you own email templates. To do it, you should follow the following steps:
- Copy the folder “Templates” into theme.
- After this, add the following code in functions.php:
 add_filter(mailtpl/customizer_template’,function(){
 return get_stylesheet_directory(). “/admin/templates/default.php”;
 });
How to customise the email notifications?
When ever you signup in some good blogs like Buddymantra you find they have customised notification for signup, lost password, and many others notification. We can do the same. Its super easy and can be done via Better Notifications for WP.
Better Notifications for WP is a among the most trusted plugin for beginners to advanced WordPress users that allows you to customise the email notifications that WordPress sends using the WYSIWYG editor and shortcodes.
You will be able to customise all default WordPress email notifications as well as lots of new ones. You can choose to send notifications to individual users, multiple users, all users in a user role, multiple roles – you name it!
Installation
- Upload the ‘Better Notifications for WP’ plugin folder to the ‘/wp-content/plugins/’ directory or install it via your WordPress Admin.
- Activate the plugin through the ‘Plugins’ menu in WordPress.
- Use the settings in the new ‘Notifications’ Menu item in the sidebar to configure the plugin.
- Test by creating a notification with some shortcodes.
For Adding New notification Go to notification>> Add new >> Name the Notification >> Select the Notification For >> Add the text or use Shortcode.
Shortcode for new user Notification
 Welcome to Scholarbasta!

Hola [user_login] ,

Congratulations, you just joined an exclusive network of over 1,000 Students.We are excited to welcome you as a new member.

Now, here are the important details of your Author profile:


[password_url]

Sincerely,

Team Scholarbasta
Short code for reset Password
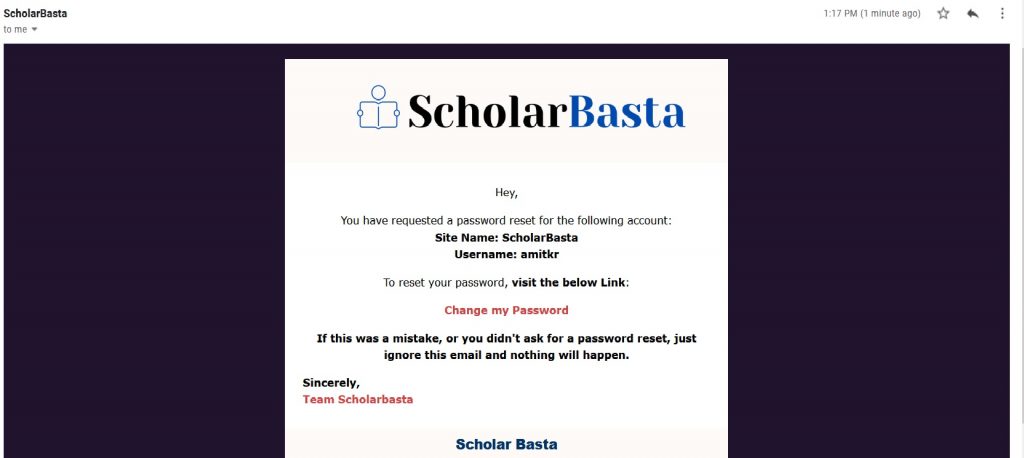
 Hey,

 You have requested a password reset for the following account:

Site Name: [global_site_title]
 Username: [email_user_login]

To reset your password, visit the below Link:

[password_reset_link]

If this was a mistake, or you didn't ask for a password reset, just ignore this email and nothing will happen.

Sincerely,
Team Scholarbasta
Conclusion:
By now, you must have known all the information about customizing the WordPress emails, which will make your brand or blog count. The different plugins and the features of Email Templates will allow you to improve the notification email of your website real quick.
So, choose everything mindfully which you think your readers will like. Good Luck!