
Raspberry Pi is a small compact small-sized computer capable of performing intense tasks like an actual computer or a laptop. Just like other hardware devices, it has plenty of models, so choose the one which best suits your need and move ahead.
Although there are plenty of models I’ll list here a few in the table below with their important specifications
| Model | Price (Approx Range in Rs) | RAM | Features | Processor |
| Pico | Under 400 | 264KB on-chip SRAM | Temperature sensor input power 1.8–5.5V DC | Dual-core Arm Cortex-M0+clock running up to 133 MHz |
| Zero | Under 1k | 512MB RAM | MicroUSB OTG port | 1GHz, single-core CPU |
| Zero W | Under 1.5k | 512MB RAM | 802.11 b/g/n wireless LAN | 1GHz, single-core CPU |
| 2 Model B | Under 3k | 1 GB | 100Base Ethernet | 900MHz quad-core ARM Cortex-A7 CPU |
| 3 Model B | Under 2.5k | 1 GB | 100Base Ethernet | Quad-Core 1.2GHz Broadcom BCM2837 64bit CPU |
| 4 Model B | Under 3k | 2/4/8 GB | Gigabit Ethernet | Quadcore Cortex-A72 (ARM v8) 64-bit |
This article includes-
- What all you need to start your RPI journey (both software and hardware)
- Installing OS on your RPI and using minimum hardware for setup
- Final steps
For more detailed specifications you can visit the Raspberry Pi Site
For this discussion, we will be using Raspberry Pi 0 W (you can use anyone :) )
Let’s get started!!
What all you need to start your RPI journey (both software and hardware):
So to start with any new device we should know about both its hardware and software part.
Here is the hardware-

The RPI doesn’t come with header pins soldered on it. So you need to do it yourself
Use 40 header pins and solder them on the board
Installing OS on your RPI and using minimum hardware for setup:
Next, you will need an SD Card to install the OS in it. We will use the Rasbian image.
Go to raspberrypi.org/software/operating-systems/ and install the Raspberry Pi OS with desktop and recommended software
This is the latest OS which comes with access to both the terminal and the GUI (desktop) of the Raspbian OS
Now download the Raspberry Pi Imager to install the OS to the microSD card.
First Format the SD card using the SD Card Formatter and then install the Raspbian image into it. This will take a while!
Once this is done successfully, we are ready to work with our RPI.
The best and easy way to get started is to use your laptop for working with RPI instead of finding a monitor and keyboard to attach with it.
Also Read Reasons Why Linux Is Getting More Popular In The Past Decade
Software Installation:
For this, we require a few software-
1.Advanced IP Scanner – advanced-ip-scanner.com
This will be used to get the IP of our Raspberry Pi
2. VNC-Viewer – realvnc.com/en/connect/download/viewer
This will be used to view and work on the Rpi
3. Putty – putty.org
This will be used to enable the ssh
To use our laptop for viewing, we need our RPI to connect to a WiFi
To do so-
After the image is installed on your SD card, go to the boot folder, make a new file, and name it as ssh. Make sure it has no extension (remove if it has any).
Leave it empty as this will be used to enable the ssh
Next, make a text file and name it as wpa_supplicant.conf and add the content shown below
ctrl_interface=DIR=/var/run/wpa_supplicant GROUP=netdev
update_config=1
country=IN
network={
        ssid="WiFi Name"
        psk="WiFi Password"
        key_mgmt=WPA-PSK
}
Replace the WiFi Name with the name of your WiFi and WiFi Password with the password of your WiFi. Also, make sure that your laptop is also connected to the same network.
Save the file and eject the SD Card and insert it in the Raspberry Pi.
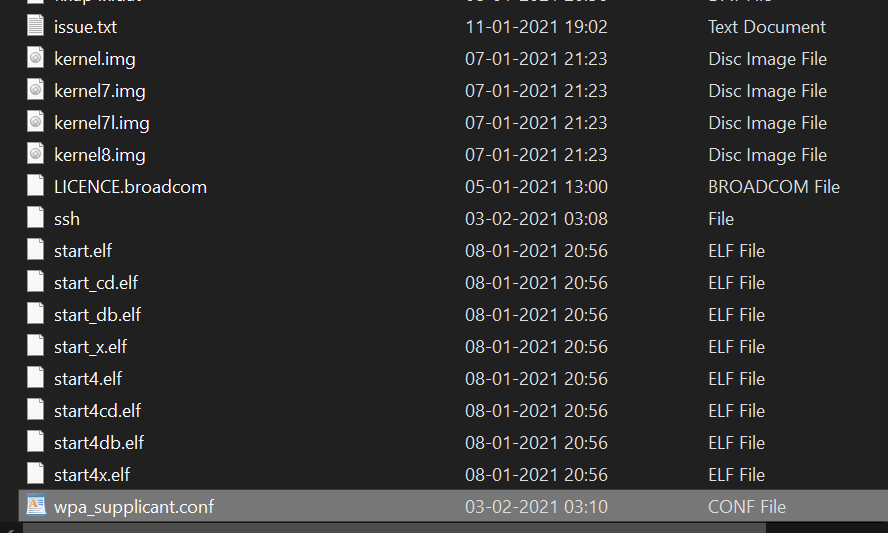
Locate the ssh and wpa_supplicant.conf files in the image above
Now connect your RPI to a 5V power supply through the port labeled PWR
An Led will glow indicating that it is powered up!
Open Command Line and type the command ipconfig
Locate the IPV4 Address and copy it
Now open the Advanced IP Scanner and in the search bar type the copied IP address and change the number after the last decimal to 1-254
For Example, if the IP address was 192.168.0.5 So change it to 192.168.0.1-254
And press Enter
This will help to get the IP address of the raspberry pi (Look for the Manufacturer as Raspberry pi Foundation)
Now select it and right-click on its Name
Select copy and then click IP
This will copy the IP address of your raspberry pi
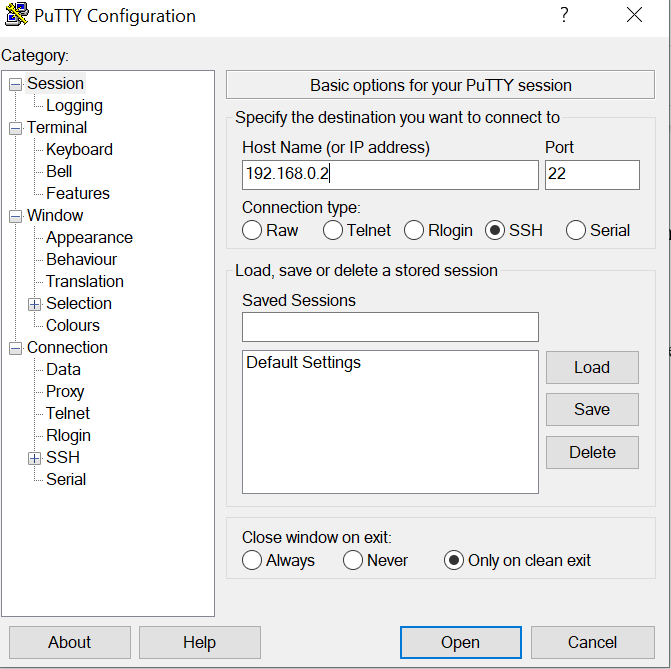
Now open PuTTY
Paste the IP address of the Raspberry pi in the Host Name and type 22 in the Port
For the Connection type select SSH and click Open.
Further select Yes
The terminal will open up and the login id will be asked
Type pi and press enter
Next, type the password as raspberry
(These are the default id and password. You can change them later)
Next type the command sudo raspi-config and press enter
This will open a new panel. Here select Interfacing Options then select SSH
Further, it will ask if SSH is to be enabled. Press Yes
Then in the interfacing options go to VNC Server and enable it
Now press Finish and close the terminal
Now run the VNC Viewer you downloaded previously and paste the IP address of the raspberry pi and press enter
If it asks for id and password use the same as before
(id- pi and password- raspberry)
Next click continue
Congratulations! It’s Done
Final Steps:
You will be able to see the Desktop of your Raspberry Pi as shown in the image below
Also, note the wifi logo shows the wifi you are connected to.
Initially, you will be asked to set a new password. You can set it and the changes will take place once you reboot your Pi

From the desktop, you can also use the terminal

This was the complete setup of our raspberry pi
In the next article, we will get started with the code and circuit designing using our raspberry pi!